

Showing posts with label TIPS & TRICK. Show all posts

Tuesday, 21 June 2016

How to Unblock Websites at School, Work, Home or Anywhere

  No comments
02:06

Internet censorship has grown drastically over the past few years with countries like China, Pakistan, Saudi Arabia, Iran taking the lead over others in blocking sources of free unbiased information. China is known to have even forced Google to filter its search results. Government censorship is not the only reason why websites are blocked. Some network administrators also prevent users from accessing certain websites which they believe are of no use in places such as schools and sometimes, even offices. In such times, you may need to access a website that is blocked. This article explains how.
Which websites are most commonly Blocked?

Unblock Websites
The most commonly blocked websites include websites about pop culture, health, medicine, women, religion and politics. Social websites are also often blocked and include the likes of Facebook, Twitter, YouTube, Pinterest, Instagram, Reddit, Digg, Hulu, LinkedIn, Tumblr, Blogger (Blogspot), MySpace, Bebo, Flickr, Yahoo! Messenger, Typepad, Technorati, StumbleUpon and Delicious. Sites like Google News, Wikipedia, Wikileaks and eBay are also blocked at certain places.

Access Blocked Websites at School, Work or Anywhere

There are many genuine reasons for which you might want to visit blocked websites at your school or office. Given below are the ways you can use to regain access to the blocked website you wish to visit.

1.
Cache method: Most search engines maintain a cache of web pages indexed by them. You can search for a website on Google , Yahoo! or Bing and click on the cached link that is given next to the result. To load the web pages more quickly, you can visit the text-only version. Since the website is provided from the search engine's servers, it can be used to overcome IP address and URL based filtering.

2.
Using Google Mobile Search: For users browsing on a slow mobile internet connection, Google Mobile search removes all CSS styling and JavaScript to present a stripped down version of the web page from Google's own server. As the content is provided from Google's servers, the blocking software feels that you are visiting Google, whereas in reality, you are viewing the blocked website. Go to Google Mobile Search. To visit the website of your choice, just replace tweakandtrick.com in the URL with the address of the website. Despite the name, Google Mobile Search can be accessed from your PC as well.

3.
Access blocked websites with Google Translate. You can use translation service from Google to visit blocked websites. To do so, enter a language different from the website's language in the 'From' field and English in the "To" field. You can also use this method to bypass software that block websites on the basis of specific keyword mentions. Just translate the URL you wish to visit in a different language to overcome the keyword block.

4.
Create a 2 layered unblocker: Go to Google Translate, open any proxy website inside it and then use that proxy website to access your blocked website. In this way, you can achieve two layered website unblocking.

5.
Use RSS Readers for accessing restricted blogs: All blogs syndicate their content via RSS feeds which you can subscribe to in web based RSS readers like Feedly to access blocked content.

6. To access a blocked website, you can enter its IP address instead of the URL in your browser's address bar. This can bypass most basic forms of website blocks. Although if the blocking software maps the IP address to the website domain, the website will still remain blocked. You can find the IP address of any website by pinging the website domain name in the Command Prompt in Windows (Terminal in other operating systems) and noting its IP address. Execute ping pc-trick1.blogspot.com in the Command Prompt to ping     pc-trick1.blogspot.com.

7.
Use IP Address to Decimal conversion: If you cannot access your blocked website by entering its IP address, you can enter the decimal equivalent of the URL's IP address to get access to it. Search Google for IP to Decimal + IP Address of the banned website and Google will convert it into decimal. Enter that into your browser's address bar and see if the blocked website opens.8. Opera Mini Simulator: Opera Mini, the mobile browser for users with a slow internet connection, can be installed on your computer. You can use this PC version to visit blocked websites as Opera Mini accesses content from Opera's servers instead of accessing it from the servers on which the website is hosted. Most websites will load through this method, although the quality of the results obtained may not be that good for JavaScript heavy websites.

9.
TOR: TOR or The Onion Router is a free software that protects the privacy and security of its users by channeling data through multiple nodes so as to prevent the original data from being unscrambled. Although browsing through TOR is a bit slow, it is one of the most effective ways of bypassing restricted websites and protecting your privacy.

10.
Proxy websites: There are many proxy websites (anonymizers) which open blocked websites on their servers and present the data to you. This hides the address of the website you are trying to visit from your internet service provider. Few popular free ones include Anonymouse and KProxy.

11.
VPN software: VPN or Virtual Private Network software can be described as a tunnel under the public network that offers more anonymity than proxy websites as it also encrypts the data transferred by the blocked website thus, offering complete anonymity. Although most VPN software are available as paid software only, HotSpotShield is a popular free alternative.

12.
IP hiding software: Sometimes, websites block users on a particular IP address from visiting themselves. In such cases, free IP hiding software like UltraSurf can be used to visit them. While free software offer very less features as compared to paid ones, they are still effective for overcoming most common blocks.

13.
Changing DNS servers: A common way of blocking websites is preventing DNS servers from giving the locations of the blocked website's servers. In such a scenario, changing your DNS servers to those of OpenDNS or Google DNS will be your best option to get over the block. As an additional advantage, this can also increase your internet speed.

14.
Edit your host files: Some malware and blocking software edit your host files and add a website's address in them to prevent you from visiting it. In such a scenario, you can edit your host file with Notepad by visiting “C:\WINDOWS\system32\drivers\etc” if C is your system drive. In Windows 10, Windows 8(.1), Windows 7, a warning from UAC might be displayed.

If you like it please share.

Read More

7 Wi-Fi Tweaks to Increase Your Speed

  No comments
02:02

Chances are if you have a wireless internet connection at your home, you have had some trouble with the speed of the connection at least once before. That being said, a slow wireless connection can be frustrating to deal with. You are probably paying good money to your internet service provider, so slow speed is something you should not have to deal with, right? Well, the truth is wireless speed can be affected by a number of things. Luckily there are some Wi-Fi tweaks you can try that should help boost your speed and get you rolling in no time.
1. Reposition Your Router

The position of your wireless router plays a major role in the speed and strength of your wireless connection. If you are having trouble, you should try to reposition your router in a centrally located area, where the signal can equally reach each wireless device in your house. If your router is near an outside wall, try to move it closer to the middle of your house. Routers that are placed near outside walls can send some of the signal outside, which can risk your wireless connection’s strength and speed.
 

2. Purchase a Wireless Signal Repeater

Adding a wireless signal repeater to your home network can greatly increase the speed of your connection. A repeater works by extending your signal without having to add any additional wires. All you have to do is simply place the wireless repeater in a location that is between your router and your wireless device(s). It will instantly boost the wireless signal that is sent from the router to your devices, meaning faster speeds for you.
 

3. Install a New Antenna

Most wireless routers come standard with an omnidirectional antenna, meaning it broadcasts the wireless signal in a circular radius to reach various places in your home. If your router is in a perfectly centered location between all of your wireless devices, this is probably fine. But if your router isn’t perfectly centered among devices, you should think about replacing the existing antenna with a stronger one, known as a high-gain antenna. You can usually remove your old antenna and replace it with one of these stronger antennas to boost your signal strength, therefore increasing the speed of your connection. Another perk of a high-gain antenna is its ability to focus the wireless signal in any direction you prefer.

Increase Wireless internet Speed

4. Use One Brand of Equipment

You may not think that using different brands of equipment can reduce the speed of your wireless connection, but in reality it can. If you use different brands of equipment, your components may not work as efficiently. This is because many manufacturers of wireless networking equipment pre-install enhancements in all of their products. These enhancements can boost speed, but will only work if products from the same manufacturer are used simultaneously. If you are using various brands of equipment and your speed is suffering, this is definitely worth a try.
 

5. Reduce Frequency Interference

Many household electronics, such as cordless telephones and baby monitors, run at the same frequency as wireless routers. This means that these electronic devices can interfere with the
wireless signal that is being broadcast from your router, which can affect the speed and performance of your connection. Check the box of your router to see what frequency it runs at, and try to avoid using other electronic devices that operate at the same frequency. You can also try to change the channel on your router to avoid frequency interference. 

6. Check for Firmware or Driver Updates Regularly

The manufacturers of wireless routers and network adapters often release firmware or driver updates that can improve the function of your wireless connection. You can find and download these updates at the manufacturers’ websites. Updates are usually done to fix issues, add features, and strengthen your equipment’s performance. Check for these updates on a regular basis to make sure your firmware and drivers are always kept up to date.
 

7. Secure Your Wireless Network

If your network is not
properly secured, neighbors could be using your signal. This can reduce the speed of your connection because you are in a sort, sharing the wireless signal. Set up secure passwords and some sort of wireless encryption that will prevent anyone else from accessing your wireless network. All of these Wi-Fi tweaks can greatly boost the speed of your wireless connection. If one of them does not seem to do the trick, try another or even a multitude of options. It may take a little time and patience, but once you figure out what works to speed up your connection, you will be happy you put forth the effort.

If you like it please share

Read More

Saturday, 18 June 2016

Watch ASCII Star Wars in Windows XP, Vista, 7, 8 & 10

  No comments
21:26

Every one of us has watched Star Wars on television, computer or in a theater. It is the same movie with aliens fighting each other for galaxies and such stuff. There is nothing new in it. But wait, have you watched an ASCII (American Standard Code for Information Interchange) version of Star Wars and that too in Windows using telnet? A network protocol known only to computer wizards. Well if you have not, then you must do it now!

There is a complete copy of Star Wars done entirely in ASCII characters that you can watch in the Windows operating system (or any OS that supports telnet). The only thing required to watch it is an internet connection; speed does not matter.

A Picture showing Star Wars in command prompt

To watch it on Windows XP, Mac OS X and Linux
  1. Go to Start, Run. (Only for Windows users)
  2. Now type "telnet towel.blinkenlights.nl" without the quotes and press Enter. Users of Mac OS X and Linux can directly execute this code in the terminal window.

On Windows 10, Windows 8, Windows 8.1, Windows 7 and Windows Vista

Telnet is turned off by default in the latest versions of Windows. So, in order to watch star wars, you must first enable telnet by going to Control Panel › Programs › Turn Windows Feature On or Off and ticking both the telnet check boxes. After doing that, follow the steps given below:-
  1. Go to Start, Search in Windows Vista and Windows 7 and Windows 10. On Windows 8 and Windows 8.1, open the main Start page.
  2. Type telnet and press Enter.
  3. In the following command prompt window, type "o" without quotes and press Enter.
  4. Now type "towel.blinkenlights.nl" without the quotes and press Enter.
If you do not need telnet anymore, you can turn it off.

A command prompt window like the one in the image will open with the movie being played in it. See the movie yourself. Did you enjoy watching this new version of Star Wars? Well, I did and know it for sure that you would have too.

If you like it please share.

Read More

How to Increase Firefox Speed, Make Firefox Faster

  No comments
21:24

Mozilla Firefox is one of the most popular web browsers in the world, and for good reason. In addition to it being free, Firefox provides a reliable and secure internet surfing experience that many people prefer over other browsers. But like those other browsers, Firefox’s speed can sometimes begin to deteriorate. When this happens, it might take you longer to load certain webpages or download certain files, which can be quite frustrating. If your Firefox speed is suffering, the following tips and shortcuts will help you increase your speed and get Firefox back to normal in no time at all.

Make Firefox faster

Quick Speed Tweaks

There are a few quick tweaks that can really increase the speed at which Firefox runs. First of all, you will want to open your Firefox browser. Go up to the address bar and type in "about:config," minus the quotation marks, of course. Once those words are typed, hit enter. Next you want to type "network.http" in the filter bar. When the settings pop up, double-click to change the "network.http.pipelining" setting to true. This should increase your browsing speeds, but may not work if you are running on a proxy server. If you are indeed using a proxy server, you should set "network.http.proxy.pipelining" to true as well by double-clicking on it. After that, change "network.http.pipelining.maxrequests" to 8. Changing this number to 8 will allow Firefox to load more than one item at once when you go to any given webpage.

For the next speed tweak, you will want to stay in the "about:config" menu, just like in the prior tweaks. Right-click anywhere in the window, select "new," then "integer" from the drop-down menu. Call the preference name "nglayout.initialpaint.delay," then change the value to the number 0. Adjusting this setting will lower the amount of time Firefox waits before displaying a webpage’s content. There are also many other settings that can be tweaked in the "about:config" menu. Some are very advanced and should only be altered by users who are very familiar with Firefox's settings.

If you have many add-ons installed, Firefox can take a lot of time to start. To make Firefox start quickly, remove the add-ons you are not using.

Other Firefox Shortcuts
Make Firefox faster

Some handy shortcuts can make your Firefox browsing experience a bit speedier. On your keyboard, hitting the spacebar while browsing will allow you to scroll down. Holding down the shift key plus the spacebar will do just the opposite and scroll your page up. Since Firefox is well known for its tabbed browsing, it would only make sense that there would be a shortcut for opening a new tab. To do this, just hold the control key and the letter "T." Hitting the "F5" key will reload any webpage for you. Holding control plus tab will take you to the next tab. Lastly, holding down the alt key plus the home key (above the numbers on your keyboard) will take you directly to your home page.

There are a few other shortcuts that exist for Firefox as well. If you use bookmarks, giving them keywords will allow you to access them much quicker. All you have to do is go to your selected bookmark and right-click on it. Choose "properties," enter an easy-to-remember keyword in the keyword field, then save it. When you type that keyword in your normal address bar, your bookmark will appear.

Also, when you wish to access a specific site on your computer, do not worry about typing the complete URL in the Firefox address bar. If you simply enter in the name of the website, such as "Google," then press control plus enter, the rest of the address (www and .com) will be filled in for you if the website has a .com domain. If the website has a .net domain, press shift plus enter. For .org websites, press control plus shift plus enter. Although these shortcuts can take some time to get used to, they can really save you time and make it easier to surf the web.

If you are having issues with your Firefox speed, take a few minutes to familiarize yourself with these tweaks and shortcuts. Once you see how easy it can be to increase your Firefox speed, you will be glad you took the time to check them out.

If you like it please share.

Read More

Make your Computer Talk

  No comments
21:13

Have you ever wondered how can you make your computer speak whatever you input to it like in the movies? Would it not be fun? If only it was possible! Rejoice, because now it is possible. Well, if you wish to know how to do this, then you have come to the right place. With this trick, you can create a script in Windows which will make your computer speak whatever you input to it.


To create one such talk script, follow the steps given below:-


Steps
  1. Open Notepad.
  2. Copy and paste the exact code given below.
          Dim Message, Speak
          Message=InputBox("Enter text","Speak")
          Set Speak=CreateObject("sapi.spvoice")
          Speak.Speak Message
        3. Click on File Menu, Save As, select All Types in Save as Type option, and save the file as Speak.vbs or "*.vbs".
        4.  Double click on the saved file, a window will open like the one in the image. Enter some text in enter text column and click OK.

    Now your Computer will speak / talk what you typed in Step 4. Try it yourself.

    Windows Compatibility: This VBS file can be executed on all versions of Windows including Windows 7, Windows 8, Windows 8.1 and Windows 10.

    Personal Experience: I personally showed this trick to many of my friends and they were literally left awestruck. You too can impress your friends by making your PC talk and be the Computer Wiz.

    If you like it please share.
    Read More

    Change your Processor's Name

      No comments
    20:38

    Are you bored with your old processor? Do you want a new processor with a breath-stopping name but are not going to upgrade any time soon? No need to worry. You can still have that new processor's name displayed in your computer. Well not only that, you can also have a better one than the one you are planning to buy. Just follow this trick.


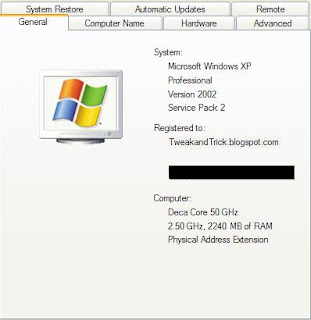
    With this trick, you can change the name of your processor to a personalized one like My Processor or something extreme like Decacore Processor 50 GHz .  These are just a few examples. You can change the name of your processor to anything you like.

    To have one such cool processor name displayed in your computer, follow these steps:-

    1. Click on Start.
    2. Click on Run.
    3. Type "regedit" without quotes.
    4. Navigate to HKEY_LOCAL_MACHINE/HARDWARE/
    5. From HARDWARE, navigate to DESCRIPTION/System/CentralProcessor/.
    6. In the work area, double click on ProcessorNameString, and change its value according to your choice.
    7. Click OK

    Changed Processor Name


    Right click on the Computer icon and select properties.The final outcome would be something like the one in the image.

    Try it on your PC and show it to your friends to see the fun.

    P.S.: Personally, I have recently changed the name of my processor to "iLife Processor 7, Alien Technologies". Tell me what you change yours to.

    Note: This article changes the processor name temporarily. To permanently change processor name, visit change processor name permanently.

    If you like it please share.

    Read More

    Change Processor Name Permanently

      No comments
    20:34

    A while ago on Tweak And Trick, I published an article on changing your processor name. But recently, Anil Kumar pointed out that the trick only changed the name temporarily.

    After a user restarts his computer, the name reverted back to original which is obvious as each time Windows boots, it checks the connected hardware and updates the registry value automatically. So, changing the processor name using the earlier article did not have permanent results.

    Thus, the alien processor name you had earlier again reverted back to the boring old one.

    Change Processor Name Permanently

    Problem: To, make the name change permanent, it was required to update the Processor Name String registry key every time Windows starts.

    Solution: It is very easy to change your processor name permanently by creating a registry key and placing a shortcut to it in the Windows start up folder. To do so, just follow the steps given below:-


    Steps :-
    1.  Open Notepad.
    2.  Copy and paste the exact code given below:-

    Windows Registry Editor Version 5.00

    [HKEY_LOCAL_MACHINE\HARDWARE\DESCRIPTION\System\CentralProcessor\0]
    "ProcessorNameString"="My Processor name 50000MHz"
    To change the processor name, edit the part of the code given in blue. Also understand that \0 in the above code should only be present if Windows store your processor name at that location. Open the Registry Editor and navigate to the above mentioned keys to check whether or not to include the \0.

    3.  Click on File Menu, click on Save As and select "All Types" in the Save as Type option. Save the file as ProcessorNameChange.reg or *.reg.
    4.  Create a new shortcut on your desktop. Enter regedit / S "Location of the .reg file" as the location of the item. For example, enter regedit /S "C:\Processor Name.reg" if your registry file is located in the root of C:\ drive.

    Processor Name

    5. Copy the created Shortcut file.
    6.  Navigate to C:\Documents and Settings\All Users\Start Menu\Programs\Startup (in Windows XP) or to C:\Users\ User-Name\AppData\Roaming\Microsoft\Windows\Start Menu\Programs\Startup (in Windows 8, Windows 7 and Windows Vista. Also remember that AppData is a hidden folder.)  if C: is your System drive.
    7.  Paste the copied file.


    This registry file would now execute each time when Windows starts and the Processor Name String would be modified each time. This means that even upon restarting your computer, you will see that the changed processor name is permanent.

    If you like it please share.

    Read More

    Useful Keyboard Shortcuts for Windows Computers

      No comments
    19:29

    While most of us are already aware of obvious keyboard shortcuts like “Alt+F4” and “Ctrl+C”, there are some obscure shortcuts which most of us tend to overlook. These keyboard shortcuts are not only useful for the average PC user but for advanced users as well. This article contains many such amazing keyboard shortcuts which if used properly could save a lot of time and effort. So let's get started.

    Windows key+D: This shortcut is the keyboard equivalent of “Show the Desktop”. It is useful for quickly minimizing every open window when someone walks in and you are doing some private work.

    Keyboard Shortcuts Windows

    Ctrl+Shift+Esc: This shortcut directly starts the task manager. While Alt+Ctrl+Del was used to bring out the Task Manager in Windows XP and earlier versions, in Windows 10, Windows 8.1, Windows 8 and Windows 7, it just brings up the lock this computer screen.

    Ctrl+Click: This shortcut is useful for opening a link in a background tab. This is useful when you have to load a page without leaving the current one.

    Alt+Print Screen: takes the screenshot of the current active window as opposed to just Print Screen which takes the screenshot of the entire screen.

    Shift+Click for Yes to All and No to All: If you have a lot of dialog boxes asking yes and no question, just shift+click Yes or No on one to yes all or no all.

    Ctrl+C on an error dialog box to copy its contents: Suppose your computer is giving an error message and you want to copy its contents to send to the support guy, what do you do? Just press Ctrl+C while the dialog box is highlighted and its contents will be copied to your clipboard.

    Ctrl+T: This keyboard shortcut opens a new tab in internet browsers.

    Ctrl+Shift+T: Reopens the last closed tab.

    Ctrl+Shift+N: This shortcut opens a new incognito window in Google Chrome.

    Ctrl+Shift+P: Opens a new private window in Mozilla Firefox.

    Alt+Enter after writing the domain name in the address bar of your browser to insert .com automatically.

    Shift+Enter inserts .net domain name extension.

    Ctrl+W: This shortcut closes the current tab in your browser quickly.

    Ctrl+Backspace: This shortcut deletes the last word you have typed. It is useful in case you typed in a wrong word and want to delete it quickly.

    Ctrl+Left or Right Arrow key: This shortcut allows you to move the cursor one word at a time instead of the default one character at a time.

    Ctrl++: This shortcut allows you to zoom in web pages in web browsers. Useful when text on a web page is too small to read properly. Ctrl+Scroll wheel can also zoom in documents, file thumbnails and icons in Windows 10, Windows 8.1, Windows 8, Windows 7 and Windows Vista.

    Ctrl+-: This shortcut does the reverse of the previous shortcut.

    Ctrl+0: Reset the webpage's zoom.

    Windows key+M: Minimizes all the open windows.

    Ctrl+L: This shortcut allows you to quickly jump to the address bar of your web browser.

    Windows key+Pause/Break: Quickly open the system properties dialog box.

    Ctrl+Shift+Delete: This shortcut opens the option to delete your browser's history, cookies, cache and other details that it stores while you browse the internet. This shortcut is extremely useful for the privacy conscious.

    Windows Key+L: This shortcut locks your computer.

    Ctrl+H: makes the history appear.

    CTRL+B: Bold CTRL+U: Underline CTRL+I: Italic.

    Alt+Select: This shortcut allows you to select rectangular blocks of text in Word processors, something that is not possible with simple select.

    F2: Allows you to rename the selected file.

    Holding Shift while inserting a device with removable storage prevents automatic run.

    Ctrl+F: This keyboard shortcut opens the Find option in any program.

    Ctrl+S: If you are working on a software and want to quickly save your progress, this shortcut will come in handy.

    Ctrl+Home and Ctrl+End: Useful for quickly going to the top and bottom of a page.

    Ctrl+P: Useful for printing the current page.

    Space Bar: While viewing a web page in a browser, pressing space bar moves the page down.

    Alt+Tab: Useful for quickly cycling between running applications. Press along with Shift to cycle backwards.

    Ctrl+Tab: Cycle between tabs in your browser.

    Ctrl+F5: Clears the cache and refreshes the current tab.

    Shift+Right click: Open alternate right click options.

    Alt+Double click: Open the file's properties. Alt+Enter can also be used for this.


    These are some keyboard shortcuts that I found extremely useful. If you know some more useful keyboard shortcuts, do mention them in the comments.

    If you like it please share.

    Read More

    Use Keyboard as Mouse [How To]

      No comments
    18:17

    If your mouse is not working and you don't wish to wait till you get a new mouse, you would definitely like to know how you can use your keyboard as mouse. It is easy to use your mouse as keyboard in Windows using the On Screen Keyboard utility, but it is also possible to do the reverse.

    Keyboard Mouse

    All you need to do is:


    Windows XP Users:-
    1. Go to Control Panel.
    2. Then click on Switch to Classic View.
    3. Then Click on Accessibility Options.
    4. Then Click on the Mouse Tab.
    5. Select Use MouseKeys.
    6. Click on OK.
    7. Then activate NumberLock (by pressing the NumLk key).
    8. You should hear a beep sound.
    9. Now you can control the mouse pointer using the arrow keys on the numeric keypad.
    use keyboard as mouse

    Windows 8, Windows 7 and Vista Users:
    1. Open Ease of Access Center by clicking the Start button , clicking Control Panel, clicking Ease of Access, and then clicking Ease of Access Center.
    2. Click Make the mouse easier to use.
    3. Under Control the mouse with the keyboard, select the Turn on Mouse Keys check box.

    You can also increase the acceleration and speed of your mouse movements according to your needs.

    You can alternately press the Alt+Shift+Num Lock combination to instantly activate Mouse keys.

    Laptop Keyboard Mouse

    For
    laptops, this will only work if your keyboard has a numeric keypad or alternate keys which you can enable by pressing the Number Lock or the Function key.

    On
    my laptop, number 6 key of the numeric keypad moves the mouse pointer left, number 4 key moves the mouse pointer right, number 2 key moves it down, number 8 key moves the mouse pointer up, number 5 and + key serve as right click while the number 0 key works as left click.

    If you like it please share.

    Read More

    Shutdown Your Computer or a Remote PC via Command Prompt

      No comments
    17:59

    Most of us shutdown our computers using the power button given in the Start menu. Some of us use the physical power button on our machines. Very few people actually use other means of shutting down a computer and even less is the number of people who use the command prompt to shutdown a computer.

    A reason for this is that most of us don't know that the command prompt can be used to not only shutdown, restart or log off 
    our computer instantly but also to shutdown a remote computer provided you have administrative access. It can also be used to hibernate a computer and give a comment containing the reason for shutdown. This post will show you how to do all this.

    Shutdown computer with command prompt
    Required
    A computer running Windows (XP, Vista, 7, 8 or 8.1) with the command prompt working perfectly, i.e. not disabled by a virus.Initial Steps
    1) Press Windows Key + R.
    2) Enter CMD and press Enter.

    This will start the command prompt. Follow the instructions below depending on what you want to do.
    Shutdown Local Machine (Your Computer)
    Type "shutdown -s" without the quotes in the command prompt and press Enter. Shutdown is the command being executed and the switch -s tells the computer to shutdown.Restart your Local Computer
    Type "shutdown -r" in the command prompt and press Enter. In this case, the command switch -r is telling the computer to restart after shutdown.Log Off the Current User
    Type "shutdown -l" in the command prompt and press Enter. The -l command switch tells the computer to log off.Shutdown a Remote Computer
    Type "shutdown -s -m \\name of the computer" in the command prompt and press Enter. Replace \\name of the computer with the actual name of the remote computer you are trying to shutdown. As mentioned earlier, you must have administrative access to the computer you are trying to shutdown. To know if you have administrative access, press Windows key + R and then type the name of the computer and press Enter.

    Note: If you don't remember the name of the remote computer, you can look for it by opening a list of all the computers you are connected to by executing "net view" in command prompt.

    If you can connect to the computer, you will be asked to login with your username and password. Upon entering them, a window will display the list of all the directories available to you. This should help you know whether you can or cannot shutdown the remote computer.
    Hibernate a Local Computer
    Type in "Rundll32.exe Powrprof.dll,SetSuspendState" without the quotes and press Enter. Your computer should hibernate, if it does not, then you must enable hibernation to do this.Shutdown your or a remote computer after a specific time
    Type "shutdown -s -t 60" to shutdown your computer after 60 seconds. Upon executing this, a countdown timer displaying a warning message will be shown. This command uses the -t command switch followed by a variable (which is 60 in this case) which represents the number of seconds after which the computer will shutdown.Display a Message containing the reason for shutdown
    Type shutdown -s  -t 500 -c "I am tired. I don't want to work anymore." (with the quotes) in the Command Prompt and press Enter. The -c switch is used in the code to give the reason for shutting down and what is followed in quotes will be displayed in the dialog box as the reason. This can be used to display all sorts of funny messages. One example :-

    Skynet has become self aware. John Connor did not stop me. You can not use your PC anymore.
    Stop a System Shutdown
    Type "shutdown -a" and press Enter. This will stop the system from shutting down if the countdown to shut down has not reached 0.

    If you like it please share.

    Read More

    Make Undeletable, Unrenamable Folders

      No comments
    17:54

    Have you ever wondered how you can make a folder which neither can be deleted nor be renamed. Well, if you have, then you have come to the right place. With this trick, you will be able to create folders in Windows which cannot be renamed or deleted.
    Basic Concept
    The basic concept behind this trick is the use of Keywords. Keywords are reserved words in any programming language that cannot be used as names of variables. Windows also uses certain keywords in its programming. Some of them are con, aux, lpt1, lpt2, lpt3, lpt4, lpt5, lpt6, lpt7, lpt8 and lpt9.

    Make Undeletable and unrenamable folders

    A Test
    To test this concept, make a new folder in Windows and try to give it a name same as any keyword mentioned above.Result
    Windows will not rename your folder to any of the keyword given above.Trick
    So the question arises, how can we make a folder with a keyword as its name? The solution to this problem is included in Windows itself. As we know that Windows has evolved from D.O.S.(Disk Operating System), its commands can be used in Windows. You can use D.O.S. Programming in Windows to create a folder with a keyword as its name using the steps given below:-
    1. Click on Start.
    2. Click on Run. Type in "cmd" without quotes.
    3. In the Command Prompt Window that opens, type the name of the drive you wish to create your folder in the format <drive-name>: and press Enter. e.g. If you wish to create the undeletable folder in D drive, type "D:" without the quotes. Note that the folder cannot be created in the root of C: drive (if C: is your system drive).
    4. Type this command- "md con\" or "md lpt1\" without the quotes and press Enter. You can choose any of the keywords given above as the name of your folder.

    Now Windows will create an undeletable, unrenamable folder in the drive you entered in
    Step 3. However, the folder can be renamed to another keyword using Windows Explorer.Deleting the Folder

    Although, it is not possible to manually delete the folder, you can delete the folder by typing "rd con\" or "rd lpt1\" in
    Step 4 instead of "md con\" or "md lpt1\". Windows Compatibility: This works on Windows XP, Windows Vista, Windows 7, Windows 8 and Windows 8.1.

    Try it yourself to create one such folder which can neither be deleted nor be renamed.


    If you like it please share.

    Read More