Tuesday 21 June 2016

How to Unblock Websites at School, Work, Home or Anywhere

  No comments
Internet censorship has grown drastically over the past few years with countries like China, Pakistan, Saudi Arabia, Iran taking the lead over others in blocking sources of free unbiased information. China is known to have even forced Google to filter its search results. Government censorship is not the only reason why websites are blocked. Some network administrators also prevent users from accessing certain websites which they believe are of no use in places such as schools and sometimes, even offices. In such times, you may need to access a website that is blocked. This article explains how.
Which websites are most commonly Blocked?
Unblock Websites
The most commonly blocked websites include websites about pop culture, health, medicine, women, religion and politics. Social websites are also often blocked and include the likes of Facebook, Twitter, YouTube, Pinterest, Instagram, Reddit, Digg, Hulu, LinkedIn, Tumblr, Blogger (Blogspot), MySpace, Bebo, Flickr, Yahoo! Messenger, Typepad, Technorati, StumbleUpon and Delicious. Sites like Google News, Wikipedia, Wikileaks and eBay are also blocked at certain places.

Access Blocked Websites at School, Work or Anywhere

There are many genuine reasons for which you might want to visit blocked websites at your school or office. Given below are the ways you can use to regain access to the blocked website you wish to visit.

1.
Cache method: Most search engines maintain a cache of web pages indexed by them. You can search for a website on Google , Yahoo! or Bing and click on the cached link that is given next to the result. To load the web pages more quickly, you can visit the text-only version. Since the website is provided from the search engine's servers, it can be used to overcome IP address and URL based filtering.

2.
Using Google Mobile Search: For users browsing on a slow mobile internet connection, Google Mobile search removes all CSS styling and JavaScript to present a stripped down version of the web page from Google's own server. As the content is provided from Google's servers, the blocking software feels that you are visiting Google, whereas in reality, you are viewing the blocked website. Go to Google Mobile Search. To visit the website of your choice, just replace tweakandtrick.com in the URL with the address of the website. Despite the name, Google Mobile Search can be accessed from your PC as well.

3.
Access blocked websites with Google Translate. You can use translation service from Google to visit blocked websites. To do so, enter a language different from the website's language in the 'From' field and English in the "To" field. You can also use this method to bypass software that block websites on the basis of specific keyword mentions. Just translate the URL you wish to visit in a different language to overcome the keyword block.

4.
Create a 2 layered unblocker: Go to Google Translate, open any proxy website inside it and then use that proxy website to access your blocked website. In this way, you can achieve two layered website unblocking.

5.
Use RSS Readers for accessing restricted blogs: All blogs syndicate their content via RSS feeds which you can subscribe to in web based RSS readers like Feedly to access blocked content.

6. To access a blocked website, you can enter its IP address instead of the URL in your browser's address bar. This can bypass most basic forms of website blocks. Although if the blocking software maps the IP address to the website domain, the website will still remain blocked. You can find the IP address of any website by pinging the website domain name in the Command Prompt in Windows (Terminal in other operating systems) and noting its IP address. Execute ping pc-trick1.blogspot.com in the Command Prompt to ping     pc-trick1.blogspot.com.

7.
Use IP Address to Decimal conversion: If you cannot access your blocked website by entering its IP address, you can enter the decimal equivalent of the URL's IP address to get access to it. Search Google for IP to Decimal + IP Address of the banned website and Google will convert it into decimal. Enter that into your browser's address bar and see if the blocked website opens.8. Opera Mini Simulator: Opera Mini, the mobile browser for users with a slow internet connection, can be installed on your computer. You can use this PC version to visit blocked websites as Opera Mini accesses content from Opera's servers instead of accessing it from the servers on which the website is hosted. Most websites will load through this method, although the quality of the results obtained may not be that good for JavaScript heavy websites.

9.
TOR: TOR or The Onion Router is a free software that protects the privacy and security of its users by channeling data through multiple nodes so as to prevent the original data from being unscrambled. Although browsing through TOR is a bit slow, it is one of the most effective ways of bypassing restricted websites and protecting your privacy.

10.
Proxy websites: There are many proxy websites (anonymizers) which open blocked websites on their servers and present the data to you. This hides the address of the website you are trying to visit from your internet service provider. Few popular free ones include Anonymouse and KProxy.

11.
VPN software: VPN or Virtual Private Network software can be described as a tunnel under the public network that offers more anonymity than proxy websites as it also encrypts the data transferred by the blocked website thus, offering complete anonymity. Although most VPN software are available as paid software only, HotSpotShield is a popular free alternative.

12.
IP hiding software: Sometimes, websites block users on a particular IP address from visiting themselves. In such cases, free IP hiding software like UltraSurf can be used to visit them. While free software offer very less features as compared to paid ones, they are still effective for overcoming most common blocks.

13.
Changing DNS servers: A common way of blocking websites is preventing DNS servers from giving the locations of the blocked website's servers. In such a scenario, changing your DNS servers to those of OpenDNS or Google DNS will be your best option to get over the block. As an additional advantage, this can also increase your internet speed.

14.
Edit your host files: Some malware and blocking software edit your host files and add a website's address in them to prevent you from visiting it. In such a scenario, you can edit your host file with Notepad by visiting “C:\WINDOWS\system32\drivers\etc” if C is your system drive. In Windows 10, Windows 8(.1), Windows 7, a warning from UAC might be displayed.

If you like it please share.

7 Wi-Fi Tweaks to Increase Your Speed

  No comments
Chances are if you have a wireless internet connection at your home, you have had some trouble with the speed of the connection at least once before. That being said, a slow wireless connection can be frustrating to deal with. You are probably paying good money to your internet service provider, so slow speed is something you should not have to deal with, right? Well, the truth is wireless speed can be affected by a number of things. Luckily there are some Wi-Fi tweaks you can try that should help boost your speed and get you rolling in no time.
1. Reposition Your Router

The position of your wireless router plays a major role in the speed and strength of your wireless connection. If you are having trouble, you should try to reposition your router in a centrally located area, where the signal can equally reach each wireless device in your house. If your router is near an outside wall, try to move it closer to the middle of your house. Routers that are placed near outside walls can send some of the signal outside, which can risk your wireless connection’s strength and speed.
 

2. Purchase a Wireless Signal Repeater

Adding a wireless signal repeater to your home network can greatly increase the speed of your connection. A repeater works by extending your signal without having to add any additional wires. All you have to do is simply place the wireless repeater in a location that is between your router and your wireless device(s). It will instantly boost the wireless signal that is sent from the router to your devices, meaning faster speeds for you.
 

3. Install a New Antenna

Most wireless routers come standard with an omnidirectional antenna, meaning it broadcasts the wireless signal in a circular radius to reach various places in your home. If your router is in a perfectly centered location between all of your wireless devices, this is probably fine. But if your router isn’t perfectly centered among devices, you should think about replacing the existing antenna with a stronger one, known as a high-gain antenna. You can usually remove your old antenna and replace it with one of these stronger antennas to boost your signal strength, therefore increasing the speed of your connection. Another perk of a high-gain antenna is its ability to focus the wireless signal in any direction you prefer.

Increase Wireless internet Speed

4. Use One Brand of Equipment

You may not think that using different brands of equipment can reduce the speed of your wireless connection, but in reality it can. If you use different brands of equipment, your components may not work as efficiently. This is because many manufacturers of wireless networking equipment pre-install enhancements in all of their products. These enhancements can boost speed, but will only work if products from the same manufacturer are used simultaneously. If you are using various brands of equipment and your speed is suffering, this is definitely worth a try.
 

5. Reduce Frequency Interference

Many household electronics, such as cordless telephones and baby monitors, run at the same frequency as wireless routers. This means that these electronic devices can interfere with the
wireless signal that is being broadcast from your router, which can affect the speed and performance of your connection. Check the box of your router to see what frequency it runs at, and try to avoid using other electronic devices that operate at the same frequency. You can also try to change the channel on your router to avoid frequency interference. 

6. Check for Firmware or Driver Updates Regularly

The manufacturers of wireless routers and network adapters often release firmware or driver updates that can improve the function of your wireless connection. You can find and download these updates at the manufacturers’ websites. Updates are usually done to fix issues, add features, and strengthen your equipment’s performance. Check for these updates on a regular basis to make sure your firmware and drivers are always kept up to date.
 

7. Secure Your Wireless Network

If your network is not
properly secured, neighbors could be using your signal. This can reduce the speed of your connection because you are in a sort, sharing the wireless signal. Set up secure passwords and some sort of wireless encryption that will prevent anyone else from accessing your wireless network. All of these Wi-Fi tweaks can greatly boost the speed of your wireless connection. If one of them does not seem to do the trick, try another or even a multitude of options. It may take a little time and patience, but once you figure out what works to speed up your connection, you will be happy you put forth the effort.

If you like it please share

Monday 20 June 2016

Cool Facebook Status, Chat Tricks and Tips

  No comments
Most of us use Facebook to interact with some of our long separated friends but that does not mean we cannot have fun on Facebook. Here is a collection of tricks, tips and Easter eggs you can use to enjoy your experience on Facebook.

Facebook Easter Eggs: Pirate Language ,Turn Facebook Upside Down

Facebook is not as famous for its Easter eggs as Microsoft, but that does not mean that Facebook's Easter eggs are not entertaining. The one which I especially find interesting is the Pirate Language trick. To enable Pirate Language in Facebook, login to Facebook, click on the down arrow at the right of the top navigation bar, click on Account Settings, click on Edit at the right of the Language option, and in the Primary Language dropdown menu, select English(Pirate) located somewhere near the bottom and be the captain of your Pirate Ship.
Facebook tricks
Blabber t' yer mates

Similarly, you can also turn
Facebook upside down by selecting English(Upside Down) from the Languages dropdown. This will flip the entire Facebook interface but your status updates would still be "normal".
Facebook Tips
See. Mark Zuckerberg does know how to headstand.


Chat on Facebook in your Firefox sidebar while browsing other Websites

To do this, you need to bookmark http://facebook.com/login.php. Then click on Show all Bookmarks (Manage Bookmarks in older versions) in the Bookmarks menu, then locate the newly created bookmark, single click on it, then click on more in the footer, then check Load this bookmark in Sidebar. Now, you can open that bookmark in Firefox's sidebar and keep on browsing other websites too.
Facebook chat

Show Facebook Status Updates only to Specific People or Hide them from someone

Facebook gives you the option to show your status updates to everyone or only your friends. You can further optimize Facebook so that your status updates are shown only to people you wish. Go to Privacy Settings by clicking the Settings icon at the right of the top navigation bar and clicking Privacy Settings. Then, in the Who can see my stuff? section, click on "Who can see your future posts?". Then, customize who you wish to show your posts by clicking on the down arrow that appears next to the Post button on the non-functional status update box. You can also hide your statuses from specific people by adding their name in the Hide from These section under Custom settings. You can also individually change the audience of your posts. Go to the post whose audience you wish to change and choose a different audience by clicking on the globe icon (which denotes that the post is public).
Hide Facebook Status

Hide your past posts so that only your friends can see them

Now you can also customize your past posts so that only your friends can see your past activity. To do this, open Facebook Privacy Settings and under the "Limit the Audience for Past Posts" option, select "Limit Old Posts."

Tag people in Status Updates, Wall Posts, Comments or Text

To tag someone in text in a manner that a link is created to the person's profile, use the @ symbol. eg. If you wish to tag John Jamison in your comment write @ John Jamison without any spelling mistake. If the person is in your friend list, a link in blue will be automatically created to the person's profile and he would be "tagged".
Tag Statuses Text Comments
Facebook text tagging in action

Write Upside Down, In Bubbles or Inverted Mirror-like text on Facebook

You might have seen many people update their Facebook status saying that "this was the last time they bought a keyboard on eBay" or "they have finally learnt how to update Facebook statuses while doing a headstand" written upside down. Here is how you too can flip text like that and add much more cool effects. Just go to Upside Down Text, uncheck Backwards effect, enter your text and copy the inverted one from the inverted text column and paste it in your status update or chats. You can also write inverted mirror like text by un-checking the upside down effect. To write in bubbles, click on the Bubble Ball text in the top Navigation bar.

e.g. Mirror Effect:- !rorrim a ni deppart ma I !oN hO

e.g. Upside Down Effect:- ɯɐp ʞǝʎqoɐɹp¡

e.g Both Mirror and Upside Down Effect:- ¡poפ ǝɯ dlǝH ˙ʎzɐɹɔ ƃuıʇʇǝƃ sı uıɐɹq ʎW

e.g. Text in Bubbles:- Ⓞⓗ Ⓝⓞ! Ⓜⓞⓡⓔ ⓑⓤⓑⓑⓛⓔⓢ


If you like it please share.

Why Facebook is Blue in Color?

  No comments
When you open Facebook, the first thing that you notice is the blue color it uses. Ever wondered why is Facebook so blue in color and not changing its color scheme?

Ever since they started as 'thefacebook', Facebook has stayed with the blue color. Although major changes have been made in the Facebook theme since then, the major unchanged thing has been the blue color.

facebook blue color
Facebook from its early days when it was known as  thefacebook

An exciting fact: In its earlier days, thefacebook.com required you to have an  .edu email id to join.

Everywhere from its login page to Facebook groups, you find only blue.

facebook is blue
Facebook Login Page. All Blue!

The reason for this is that  Mark Zuckerberg, the young founder of Facebook is red-green color-blind and blue is the richest colour for him which he confirmed in an online interview with Leo Laporte.

Another important commercial factor for using blue color is the fact that most colors tend to distract the viewers. Blue on the other hand acts as a transparent background to the main content as visible to the human brain due to which most popular websites tend to use the blue color. It can easily be called a webmaster's favorite color. Blue color is also sometimes referred to as 'Nirvana' for the brain.

All these factors make blue a prominent color on Facebook.

If you are bored with Facebook's blue theme and want a stylish theme, visit
Change Facebook Theme.

If you like it please share.

Safety and Security Risks When Using Facebook

  No comments
There is no doubt that the biggest social networking site taking over the whole globe is Facebook. Since it’s the biggest thing the online world has ever seen for the last several years, it’s critical that you understand the guidelines and policies listed on the site. They’re very useful in keeping you informed with various aspects of the site and how it runs.

You should know by now that for every website that you go to, there’s always a good chance of encountering good and bad users.
Facebook can be accessed by just about anybody so it’s imperative that you are wise and conscious with how you distribute or share information about yourself on it (and other social networking sites for that matter).
Facebook Security Risks

Identity theft is one of the biggest concerns in the online world today. They are real and can devastate a person’s life if the person isn’t aware of what’s going on.

The internet is fun to be on nowadays since it helps you to keep in touch with your old and new friends, family and associates. You can share content such as pictures with anyone who has an internet connection, play games seamlessly through a virtual portal, being aware of announcements and updates of certain events and entertaining friend requests. Such things have prompted users to come back for more and what many aren’t aware of is the fact that they are vulnerable to online predators and criminals.

So what should you do to help protect yourself from the bad guys out there? Here are just some helpful things that can help you in the long run if you follow them religiously:
1. Understand how the security feature works on Facebook.
As you are well aware, Facebook is known for periodically modifying its security settings. You will observe posts from the site of the changes being made with regards to its security features that lets other users see content that you don’t want them to view. It’s critical that you look into this carefully and see if the changes can significantly affect you in some way.2. Don’t reveal too much information on Facebook.
One of the most obvious ways of getting in trouble within the biggest social networking site is by revealing too much information on just about everything (including yourself). You should be aware of the things that you’re sharing, be it your profile, wall posts, messages and even the content that you share such as pictures and videos. You’ll never know, criminals would use whatever it is you post for their own evil means.3. Pay attention to links, e-mails or friends
Social networking sites these can be penetrated by online criminals who use sites like Facebook to gain information about you. This can occur through a sent or posted link, which will in turn eject a virus or spyware to retrieve personal information about you. If you happen to receive a link that you find suspicious, ask your friends about it or simply delete it.

With the evolution of technology, cyber criminals are more smarter than ever. If you are constantly paying attention for any suspicious activity that comes your way, you can
shield yourself from identity theft and other online criminal acts.

Make Facebook Photos & Posts Private

  No comments
Do you have private pictures of yourself or your family on Facebook which you don't want the entire world to see? This guide will help you change your Facebook privacy settings to only allow your friends or people you know to see your Facebook photos (and everything else you do). You can even customize the privacy settings of individual albums to share them with a small group of people like your co-workers or relatives.
Make Facebook Photos & Posts Private
There are three ways in which you can do this. Either, you can customize each wall post's or photo's settings individually, or set the preferences for specific albums or use a general setting for all posts and photos you have.

1: Choosing an individual wall post's or photo's privacy settings

While posting your photo or post, click on the down arrow left to the post button. Select Custom from the drop-down menu. Using the pop-up, select who you wish to make a post visible to. You can select if you wish to show a post to friends, friends of friends or specific people or a specific list of people.
Make Facebook Photos Private
Select Custom Privacy Options
You can even hide a photo from specific people or a list of people. This will be especially useful in situations where you don't want your colleagues to see a certain picture that makes fun of them or something similar. Normally, when someone is tagged in a photo, every friend of that Facebook user gets to know about it. So, if you chose to make a photo visible to friends and someone is tagged in that picture, all their friends will see that image. To prevent this, uncheck the Friends of those tagged checkmark.
Facebook Pictures & Posts Private

2: Limiting the Audience for an entire album

This is much similar to setting the audience for an individual picture. Just go to your albums, click on the Settings icon on the bottom right of the album whose privacy settings you wish to customize. Then select Custom from the drop down menu. The options Facebook offers are almost the same as those for an individual photo, however there is one difference.
Private Pictures Facebook Posts

All those people who are tagged and their friends would still be able to see the photos in your album. To prevent this, you will have to change the privacy settings of each individual photo.

Facebook photos & posts privacy settings

3: Making all your Photos and Posts Private

This is the permanent solution against worrying about your Facebook content. However, it doesn't offer much customization options and should only be used if you are sure how you will use Facebook. This is a 2 step process and involves customizing the audience for your past posts as well as those you will make in future.Step 1: Limiting Past Posts & Photos
Go to your Privacy Settings, and then go to "Limit the audience for posts you've shared with friends of friends or Public?." Then click on the "Limit Old Posts" button. In the pop-up, click Confirm. This is a permanent change and cannot be undone. However, all those tagged and their friends would still be able to see your posts. To prevent this, you will have to change each post's settings individually.Step 2: Limiting Future Posts and Photos

Facebook Content & Photos Private

While in the privacy center, click on "Who can see your future posts?" This will open a non-functional status update box. However, the privacy options that open when clicking on the down arrow right next to the post button are functional and act as global defaults for the content you post on Facebook in the future. Make sure to select friends if you only wish to share content with your friends. You can however, change this according to your needs; but for most people, friends would be the best option. You can further improve your privacy by selecting Custom and then unchecking the check box that appears next to "Friends of those tagged". This will customize your Facebook settings to show your Facebook activity only to your friends and those tagged.

You can also select who gets tagged in your content to further prevent your content from appearing in front of unwanted eyes. To do this, go to your Privacy Settings from the Settings icon located at the top right of the blue Facebook bar. Then, in Privacy Settings, click on Timeline and Tagging. Then under, "How can I manage tags people add and tagging suggestions?", select Enabled to
review tags that friends add to your posts.

Facebook's privacy settings take some time to adjust but once you are done, you will never have to worry about your content ending up in front of unwanted users.


If you like it please share.

Change Facebook Theme, Color & Appearance

  No comments
Facebook is a social networking site which enables people to connect with friends and people around. That's how Facebook is usually introduced. However, Facebook is beyond the need of being introduced as almost everyone is on it. Despite its popularity, Facebook has one flaw; the default blue theme is really boring.

Some even consider it an annoyance while visiting Facebook. As Facebook does not allow users to change its theme like MySpace used to, users are left with no other option but to bear the theme Facebook wants them to use.

However, it is relatively easy to change the
Facebook theme to a stylish one using an addon and custom themes which are available free of cost on the internet.

An example of the final outcome would be something like in the image.

Change Facebook Theme
This is the Ferrari theme. More themes are available for you to choose.


Requirement: The basic requirement for this to work is to have Mozilla Firefox or Google Chrome as your browser.
Steps to achieve this: If you use Google Chrome and Mozilla Firefox users should carry out the following steps to successfully change Facebook theme.
  1. Open Mozilla Firefox and install 'Stylish' addon.
  2. Follow the basic steps to install the addon.
  3. Restart Firefox after successfully installing the Stylish addon.
  4. Login to your Facebook Account and click on the small 'S' button in your Firefox status bar.
  5. Click on "Find Styles for this Site" to open a new tab with free themes to use for Facebook.
  6. Click on any theme and a preview will be shown.
  7. If everything is fine in the previewed theme, click on "Install with Stylish" button at the top right corner of the page.
  8. A dialog box will open.
  9. Click on Install in the dialog box.

Steps for Google Chrome
  1. Install Stylish for Chrome from the Chrome Web Store.
  2. Navigate to Facebook.com and click on the S button.
  3. Click on "Find Styles for this Site" to open a new tab with free themes to use for Facebook.
  4. Click on any theme and a preview will be shown.
  5. If everything is fine in the previewed theme, click on "Install with Stylish" button at the top right corner of the page.

Stylish Button


facebook theme change

Install with stylish

Installing Ferrari theme for Stylish Firefox

Now whenever you open Facebook, it will show the theme that you have installed with Stylish instead of the boring old blue theme.

If you like it please share.

Sunday 19 June 2016

I'm Feeling Lucky Easter Eggs on Google

  No comments
Although Google feels the I'm feeling lucky button is not 'as useful', it can still be used to try some excellent 3rd party Easter eggs that are a direct result of Google bombing (remember miserable failure and the whole George Bush case?).

While I have already written about some of these, I missed some immensely popular ones. So, this is a roundup article of all those funny "first results" I did not include in the 
previous article. Before starting this list, I would advise you to disable Instant from your Google preferences. To get the most out of this article, go to Google's homepage, type in these phrases and hit the I'm Feeling Lucky button.
I'm feeling lucky Easter eggs on Google
Google Loco
Type Google Loco in the Search box, hit the I'm feeling lucky button and you will be taken to a Google homepage where each letter of the Google logo will continuously dance. Also, the search button and the I'm feeling lucky lucky button are written in the incomprehensible Wingdings font. What you type in the search box also appears in the same font. Even the search box changes its colour every time you type a letter.
Google Pacman
Google I'm feeling lucky Easter eggs
Not a Google bomb but an immensely popular doodle which Google used on its homepage on the 30th anniversary of Pacman, the arcade game in May 2010. Just type Google Pacman in the search box, hit the I'm feeling lucky button and you will be taken to the Google Pacman page. You can use your arrow keys to start playing the game. To play in 2 player mode, hit the Insert Coin button. W, S, A and D keys will control the second player.
 Google Guitar (Les Paul Doodle)
Another very popular doodle which Google featured on its homepage to mark the 96th birthday of Les Paul. This flash and JavaScript based doodle allows users to not only play tunes by holding down the guitar and twanging its strings but also to record them. It also gives a link to share the recorded tunes with your friends. Just use the Google Guitar phrase or directly head over to Google Guitar.
Google Hacker
I'm feeling lucky
Ever wondered what Google would look like if it was hacked? Google Hacker can give you an idea of such a scenario. Just use the Google Hacker phrase and you will be taken to a Google homepage entirely in the leet language ( the language supposed to be used by hackers), where Normal Search is n0rM4L s34rCh, and the I'm feeling lucky button is "Eye Am ph33|1n6 |u(ky." This is an official Easter egg by one of those crazy Google engineers.
Google Weenie
Do you get angry at websites with extremely small fonts? Google weenie will definitely make you angry then. Type this phrase in the Google Search box and you will be taken to a Google homepage where everything decreases in size until it becomes a bit too small to read. This website is the exact opposite of Epic Google where everything grows in size.
Google Magic
I'm feeling lucky Easter eggs on Google
Do you like magic? Here's a trick to impress your friends with. Type in Google Magic in the Google search box and hit the I'm feeling lucky button and you will be taken to a special Google homepage. On this page, cover the two O's in the Google Logo with your hand and click anywhere on the page. Wait for sometime (5 seconds). You can say some magic words to add effect. Remove your hand and you will be surprised to see that the two O's have disappeared. Again cover the two O's and click anywhere on the page. Again wait for 5 seconds and the O's will magically reappear. A third click however will take you to the actual Google homepage.
Search Google in different colors
Are you bored of Google's default color scheme and want to try something different? Then search Google in different colors. Just use the word Google followed by your color and hit the I'm feeling lucky button and you will be taken to a Google homepage in that paricluar color. (e.g: Google Pink, Google blue etc.)
Some more I'm feeling lucky fun
In order to allow you to fully enjoy the surprise, the following keywords haven't been provided a detailed description. Just type them in the search bar and hit the I'm feeling lucky button, or alternatively click on the first search result.
Google Flight SimulatorGoogle GothicGoglogoGoogle Reverse
Google PiglatinGoogle GodEwmew FuddGoogle Bork
Pigeon RankGoogle KlingonGoogle ChurchThe Google Book
Mental PlexGoogle GulpGoogle TiSPCADIE
gDay with MATETranslate for AnimalsGoogle PondG.C.H.E.E.S.E.
Funny Google"Googlo"Google Blackle
Google Variations

Google - I'm Feeling Lucky Tricks & Jokes

  No comments
Google is the search engine of choice for most users. This is well represented by the fact that Google averages one billion unique visitors every month. A reason for this popularity is Google's characteristic to integrate simplicity with usability.

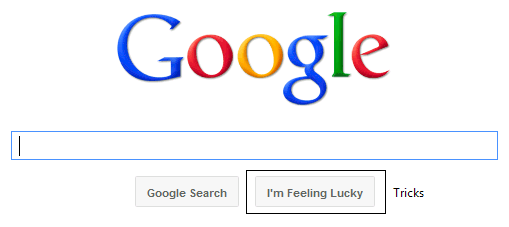
Another major reason for this popularity is Google's minimalistic homepage, which consists of a search bar and two buttons, Search and I'm Feeling Lucky. We all know what the search button does, it takes us to a search results page consisting of top ten results that match our query. The "I'm Feeling Lucky" button on the other hand takes you to the top ranking page in the search results for a particular query.

Im feeling lucky

Some webpages use this behavior to create some amazing and funny results. Here is a list of few such keywords that have some funny websites at the first position in Google. To use these tricks, open
Google's homepage, type in the phrase and hit the I'm feeling lucky button. To use the I'm feeling lucky button, you have to disable Google Instant.
Google Gravity
I am feeling lucky, Google
The force of gravity is non-existent in cyber space. Google gravity makes you realize how Google would have been if gravity had been effective on the internet as well. Just type Google gravity in the search bar and press the I'm feeling lucky button. This will take you to the Google gravity page which, at first look, might appear to be the Google homepage itself. Wait for a few seconds and you will realize why this Chrome experiment is called Google gravity. Although the website lists it as a Chrome experiment, it works on Mozilla Firefox as well, although it does not work on IE8 and previous versions of IE.
Google Sphere
Want to see images on Google dance in circular motion? Google sphere is the phrase for that. This phrase will take you to the Google sphere Chrome experiment. Google sphere is a modified version of Image search that adds a bit of fun to your regular search. This Chrome experiment, just like the previous one, works on Chrome, Firefox and IE9.
Epic Google 
Epic Google will take you to a growing version of Google that will continue to increase in size until it becomes too large to read.
I'm feeling lucky tricks
Enable Pirate language in Google
Remember the Facebook Pirate language trick? Google too has their own pirate version to compete with that of Facebook's. Just use the Google Pirate phrase or directly head over to Google Pirate.
Google Rainbow
This phrase will take you to a Google search homepage in which each element changes its color rapidly to create the rainbow effect. The search result page obtained for queries is very annoying too as it contains a very loud color combination of red, blue and green.
Annoying Google
Want to get annoyed while searching on Google? This one is for you. This phrase will take you to a Google search homepage with each word having alternate capital and small letters making everything a bit too hard to read.
2204355
Are you already familiar with the age old internet prank called rick-rolling and want to discover something new? Chicken rolling is for you. Try this new way of trapping unsuspecting internet users by typing the code 2204355 in the Google search box and hitting the "Lucky button."
LOL Limewire
Type in LOL Limewire in Google and you will be taken to a .swf file claiming that you are a pirate and telling you to "do what you want cause a pirate is free." Funny!
Google funny feeling lucky tricks
Find Chuck Norris
This one is for all fans of Chuck Norris jokes. We all know that you don't find Chuck Norris, he finds you. The find Chuck Norris phrase proves the fact further.
Who is the cutest?
Want to know who is the cutest person in the world? Just use this phrase. This one will definitely make you smile.

Most of these websites are not owned by Google. They were created independently to achieve these effects.

If you like it please share

Tips to Keep Your Android Mobile Phone Safe

  No comments
With the amount of information we keep on our smartphones, it's increasingly vital that we protect them and the data they house. I don't want to sound like a fear-monger, but the fact is your phone can be lost or stolen, it can be destroyed, or its contents can be hacked via malware. Here are a few basic and advanced tips to consider to protect everything from your work files to contact information.
The Basics: Keep Your Phone Locked
It's extremely easy and effective to lock down access to your Android phone using built-in tools. Simply tap your way to the "Location and Security" setting. There you can create either a standard password or a screen lock pattern. If you use the screen lock pattern tool, be sure not to make an extremely easy and obvious pattern.
Android Mobiles Security Tips

For Added Security: Hidden Lock adds an extra layer of security that is easy to implement but hard for would-be thieves to crack. After you have unlocked your phone using a password, Hidden Locks requires you to tap a hidden button before you can use the phone.Avoiding Malicious Apps
Viruses and other malware are increasingly targeting the Android platform, so it's important to take a few precautions to avoid infecting your own phone or tablet.

For the ultimate in security, I recommend only downloading apps from the official
Google Play store, where they have been vetted. Scammers have been known to create fake versions of popular apps, which are loaded with malware and only available at third-party websites.

However, some apps may simply not be available on the app store. If you see an intriguing app, you can verify its reputation by searching for it on Google and seeing if it has been written about, positively or negatively. Be wary of totally obscure apps.
Note App Permissions
Take the time to learn what permissions an app wishes to access, from making phone calls to using your system tools. While it makes sense that a social networking app may wish to access your contacts, it doesn't make sense that a "dancing dog" app would. Be wary when apps ask for more than seems to make sense.Consider an Anti-Virus
Finally, you can consider an anti-virus program for Android. Savvy users may not need these programs, but apps like Lookout Security & Antivirus do offer powerful features for added protection.Find Your Lost Phone and Erase Data Remotely
Thanks to GPS and wireless Internet, you can locate a missing Android phone using one of the several apps available. I recommend Android Lost (free). Even with your speakers turned off, you can use this app to play a sound, which is handy when you simply lose the phone in your house. Furthermore, this app also enables you to erase all the phone's data, saving your contact information and files from prying eyes.

You can also take pictures from your camera to know who is using your phone. And better yet: This app can be
installed remotely, so you can install it after you have lost your phone. (However, I strongly recommend installing it right away.)And Don't Forget Physical Mishaps
All the security measures in the world won't matter if your phone breaks from a simple drop. Be sure to invest in a quality case.

If you like it please share.

Increase Battery Life on Android Mobile Phones

  No comments
Anyone who has a smartphone knows that battery life is an issue. At the moment, the smartphone industry tends to favor performance over battery life when developing specifications for their new devices. To be perfectly honest, I am all for this. I would argue that it's better to have a zippy phone that acts quickly when I need it to rather than a slow, less sleek device that can withstand a few days of use without charging.

This is probably because I've mastered getting what I need from my phone while using the smallest amount of battery resources possible. Getting the best battery life from your phone can be somewhat complicated because everyone has a different opinion on what you should use and which (if any) features you should sacrifice to conserve battery. Fortunately, I have a simple method that works for every Android phone I've ever encountered.

Increase Android Battery Life

Display Screen

As a universal fact across all phones, the biggest drain on your battery is your display screen. Personally, I've found the auto-brightness control to work extremely well. To adjust to auto-brightness, go to 
Settings
àDisplay settingsàBrightness, and then just check Automatic brightness. It dims the brightness when you're in darker rooms (as it doesn't need to compete against other light sources and glare), but will really up the brightness if you're outside so that your phone is actually usable. However, if I'm really trying to conserve battery, I will turn off auto-brightness and set the brightness to very low (around 25%).

Also, be sure that you don't have an extremely long timeout (inactivity time before your screen automatically shuts off) as this will drain your battery. I personally just prefer shutting the screen off manually by pressing the power button rather than waiting for a timeout; this way my phone won't timeout on me when I am just reading something on it.
Live Wallpapers
Live wallpapers have a considerable impact on your battery life. Not using them is always a good idea if you want the best time from your battery.Close Unnecessary Applications
If your phone has some applications running that you are not currently using, you should close them from the Task manager to avoid putting unwanted pressure on your phone which in turn will cause your battery to drain quickly.Reduce Volume of speakers
Lowering volume of your phone's speakers can also have noticeable improvements in your phone's battery life.The Power Control Widget

If you have a fairly recent phone (anything running Android 2.1 or higher), you are already blessed with a completely awesome "Power control" widget. If your phone does not have this widget, you could always download one from the Play store. This is a must for your home-screen. With this widget, you can enable and disable WiFi, Bluetooth, GPS, and Auto-sync in addition to adjusting brightness levels between auto, low, medium, and high.

The only thing this widget left me wanting was the ability to enable and disable mobile wireless networks(3G and/or 4G network). Some phones allow you to do this by pulling down the "status bar" at the top of your phone (where notifications, battery life, and signal are) and selecting or unselecting "Mobile data." Other phones allow you to control mobile wireless networks by holding down the power button. Worst case scenario, you can adjust it in "Settings."

Now, when to enable and disable these features, all boils down to preference. I only use Bluetooth, WiFi, and GPS as I need it; otherwise it's off. If you have a WiFi connection available, it's generally better for your battery to use it rather than using your mobile wireless network (especially if you get poor signal for your mobile wireless).

If you like it please share.

Wirelessly Transfer Files on Android Devices With Dropbox

  No comments
As great as smart phones have become when it comes to handling our digital lives, there are still a few tiresome concessions we make for their use. One is having to plug our device into our computer in order to transfer files. Some manufacturers such as Apple have launched new services to alleviate that using cloud computing. Here is one way you can send files to your Android based phone completely free without the help of a USB cable.

Transfer files android wireless
Transferring files wirelessly on Android using Dropbox is easy

Step 1: On your computer, navigate to dropbox.com and download the application installer.Step 2: Once the application has been downloaded, run it and an initial set up wizard should begin. Step 3: Using the initial set up wizard, create a Dropbox account by entering your name, email address and computer name.Step 4: A folder called Dropbox should now be available on your computer. Put any file you wish to wirelessly send to your phone in this folder.Step 5: On your Android phone, open your App drawer and open the Market application.Step 6: Search for Dropbox and install the application.Step 7: Once installed, return home and re-open your App drawer and start up the Dropbox app.  

Step 8: Tap the existing Dropbox account button and log in using the account you just created in step 3.

You should now see any files you have in the Dropbox folder. Transferring additional files to your phone wirelessly is now as easy as dragging them into the folder and starting the app on your phone. Dropbox allows you to send up to 2GBs of data for free. Any files larger than that will either have to be transferred via hard connection or you’ll have to sign up for a 50 or 100 GB plan.

If you like it please share.